Well, after
my mom got me on a roll getting my house more livable I figured I better not stop. Since she left, I have continued to work on the house,
“making” our home. For the last two weeks now, I have completely halted all hand work, craft, knitting and the like. I’m getting a smidge grumpy about it. I don’t even want to talk about the untouched piles of to-do stuff at my desk. But, you know, sometimes priorities have to shift on the fly.
Even Sandy, my dear hubby, said to me yesterday, “You know, I feel more at home now than I have since we moved. The effort you’ve put into the house stuff has been worth it. Thank you.” Awww. Just when I’m ready to kick him to the curb for working all the time, he goes and says something super sweet.
Now, let me show you the embarrassing truth. I kid you not, that we have been living in the powder room like this for 7 months. What??? I’m busy! Yes, it’s about time I put down my DIYs to pay a little attention to our dear home.
So! I’ve officially decided to add areas of my house to my finish fifty list. I think this is only fair. It may not fit in a bin, but it’s still a project, that’s for sure! Are you willing to bear with me if there’s a little less handmade and a little more before and after happening here? There will be some interior design inspiration and some low-cost solutions to big-house problems, too. Our house needs significant renovation to the kitchen so I don’t want to actually buy a lot until we know what we’re doing, so things are mainly going to be make-do, instead of buy-new.
On to the project at hand. The powder room is located under our stairway, through that door on the left. The powder room has a low ceiling and is small with a depressing paint job. I would repaint, but there’s a possibility that the bathroom might move in the renovation, so I’m keeping change to a minimum.
Six Steps to a Powder Room Makeover:
1) Touch up the paint.
The walls were a disaster. I cleaned them with a paper towel and water. When that dried, I used putty to fill in the holes, using a putty knife to smooth it out. I used more paper towel to clean the putty from around the holes and scrapes – lots of picture hook holes. I did take photos of that process, (and this shows how nutty I’ve been), but I took all the photos with out the CF card in -hrmph. Anyway, while the putty dried, I took off the light plate cover. See photo below – it comes off easily by undoing the two screws on the plate. I brought it to the paint store and they matched the paint color for me in a jiffy. I came home, grabbed one of the kids paint brushes, opened the can, dab, dab, dab, feather the edges, and I was done.
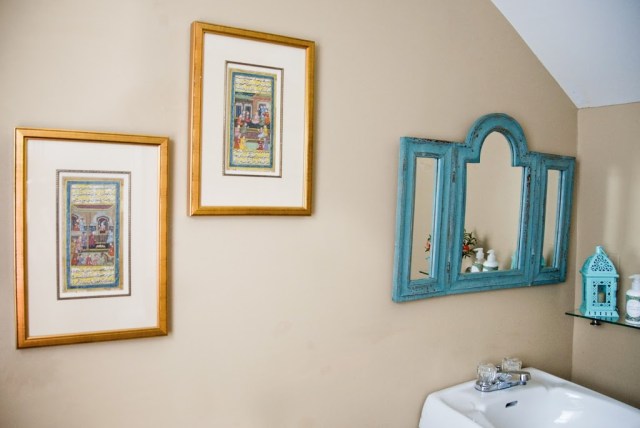
2) Hang a interesting mirror over the sink.
This mirror is an antique I found in Boulder at a thrift store a number of years ago. I loved the color and its chipped paint. It has panels that swing forward which always made it tricky to hang. It hung for years in the basement bathroom in Boulder with the panels swung forward (my procrastination on the home front is not new!) This time, I bought some
Scotch All-Weather Fasteners with adhesive and cut a little square for each side, so the mirror is now velcro-ed to the wall (thanks for the idea, mom!)
3) Maintain privacy.
I added a really sweet, but inexpensive, lace
cafe curtain to the window for privacy that I found at Bed Bath & Beyond. You
know I had all sorts of mad plans to hand crochet an edging on some beautiful white fabric I had in my stash. But, it’s time for discipline people. If I wait to do that (still somewhere on some list), I’ll never get the bathroom to good working condition. Time to get ‘er done.
4) Hang artwork.
I hung art work on the wall opposite the mirror. Something to look at while you dry your hands.
Over the toilet, I hung these antique book pages, which Sandy and I purchased in India when we traveled there over 13 years ago. The illustrations are amazing!
5) Make functional.
This bathroom really needed a shelf. The sink top is at an angle. If you put anything larger than a quarter down, it simply slides into the sink. The toilet top is tippy, too, and you don’t want to know what I lost down there. So, I actually hung a shelf! What is shocking about this is that I bought it one day and I installed it the next! I actually went down to the tool table and got the drill. Yowsers! I’m on fire. (Read: typically would sit on floor of powder room for another 6 months).
6) Make pretty.
Don’t forget some snazzy hand towels. I bought these towels at a local flower shop in Roland Park that I love,
Crimson & Clover. They are handmade (natch!)
Voila, six steps to a powder room update. You have no idea how happy it makes me that this powder room is complete. Well, it has a fluorescent light fixture that has only 4" of room to hang. That one will take some effort to track down a replacement and a professional to install, but that’s all!


Leave a comment
This site is protected by hCaptcha and the hCaptcha Privacy Policy and Terms of Service apply.