Skip to content

Cart

Your cart is empty

Sign up for our newsletter

GET 10% OFF FOR SIGNING UP! Receive updates on new kits, sales, freebies, helpful info + more.

Blog

blackboard

DIY Geo Chalkboard Place Cards
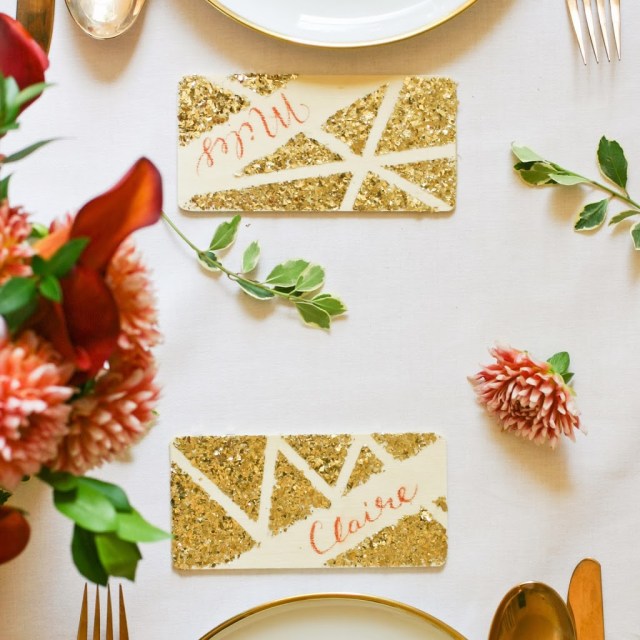
I am actually hosting Thanksgiving this year. Gulp! This is new for me as usually we pack up the family and brave the travel insanity to be with extended family. This time, my family is coming here to Baltimore. I want to add a DIY touch to the dinner and think reusable place cards is a great place to start. These beauties use *clear* chalkboard paint from Martha Stewart as a base, vintage leaf glitter in geometric patterns, with chalk pencils to pen the names. I’m in love with the result.
I have always been partial to place cards. There’s something about the elegance they add to a table that elevates dinner to an event. I especially love that these are something I can use again and again!
Using this kind of coarse glitter brings lovely extra texture and offers a wonderful glow to the whole affair. With all the colors available, you can customize the place cards to match your china or table, too. These place cards are easy to make in a couple of hours. I am even more happy that they aren’t only for one-time use. With a little water and a q-tip, you erase the name at the end of the night, and they are ready again for your next event.
I absolutely love how these look on my fruit plates–thanks again, Mom!

DIY Instructions for Geo Chalkboard Place Cards

Materials:
Martha Stewart Clear Multi-Surface Chalkboard Paint (found clear at Michael’s)
Martha Stewart Glittering Glue
Martha Stewart Vintage Leaf Glitter in Gold
Masking Tape (I used some washi tape I had on hand, but if you have 1/8" tape and 1" wide tape, you’d be sitting pretty!)
Paint Brush
Balsa Wood Rectangles/Slats (5 1/4 x 3 1/2), similar to these
Chalk Pencil, similar to these
Craft Knife (not shown)
Ruler (not shown)
Acrylic Sealer (not shown)

All the Martha Stewart products I found at Michael’s, but you can find them at Joann’s, Martha Stewart Crafts, Amazon and many other places.

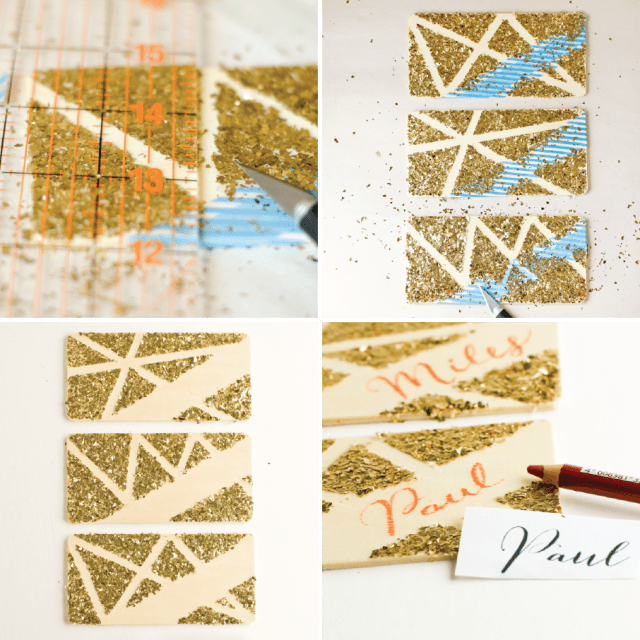
First, paint each rectangle with the clear chalkboard paint. Let dry. Repeat with a second coat. Create 1" tape using a ruler. This obviously would be easier if you actually had 1" tape! It’s always good to work with what you have, though. Apply to rectangle at desired angle.
Mark the other cards with a pencil to guide tape placement and apply the 1" tape to each. Create 1/8" tape using a ruler and craft knife. Apply tape to each place card to create a geometrical pattern. I wanted each place card to be unique, so I varied my lines and shapes.

Paint each place card with Martha Stewart Glittering Glue or other craft glue. Sprinkle glitter on top of glue areas. Pat with finger. Let dry mostly. When the glue is still slightly tacky, remove the 1/8" tape. Important: Leave the 1" tape across where the name will be written for now.

When dry, clean up edges a bit with a craft knife and ruler if needed. If you use finer glitter, you’ll be able to skip this part. Leave the name tape on and spray place cards with an acrylic sealer (or apply another coat of glue to seal the glitter.) Remove name tape AFTER application of the sealer.

Print out names of party guests in a calligraphy font, like Bombshell, the one shown. I love this font–it’s been worth every penny! You can find free calligraphy fonts here, as well. Simply mimic the font in a chalk pencil on the name section of the place card. It’s a lot easier than it looks and when you thicken the line where it’s thick, and keep it thin where it’s thin, it works pretty darn well!

When you’re done with your party, take a q-tip and water and erase the name. The water got the card pretty clean. I used a touch of alcohol to take away the last bit of residual color but don’t use too much or it will dissolve the chalkboard paint.

Voila! Give it a whirl this holiday season and add a touch of glam to your table for years to come!

Leave a comment

This site is protected by hCaptcha and the hCaptcha Privacy Policy and Terms of Service apply.

All comments are moderated before being published.

Read more

Fall in Baltimore
Baltimore

Fall in Baltimore

It’s hard for me to believe that we have come one full turn of the earth here in Baltimore. It is starting to feel more like home. . .just barely. There’s something about having things happen ag...

Read more
Spread Some Surprise Love - How to Wrap A Mini-Bouquet of Thanks DIY
bouquet

Spread Some Surprise Love - How to Wrap A Mini-Bouquet of Thanks DIY

After styling the shoot for the DIY Geo Chalkboard Place Cards, I had a collection of beautiful flowers left over. Yes, I did this two weeks ago! Can you tell I’m behind? Anyway, those ...

Read more