Five Things I Learned from Aran Goyoaga
I had the extreme good fortune of taking a food styling photography class from the uber talented Aran Goyoaga of Cannelle et Vanille while I was at the Makerie Retreat in Boulder. She is an amazing food stylist, chef and photographer. I highly encourage you to check out her blog and her upcoming book, Small Plates and Sweet Treats . . .uh, can you say YUM! It looks phenomenal. Also, if you ever get a chance to take a class from her, DO, it is worth every penny! Watching her work is such a treat.
Now, flax & twine is not going to become a food blog, but I wanted to share some of my favorite food photos from the day and some of the things I learned in class. All the shots included in this post are mine. Looking at them all made me think about my progress in photography, as well.
 |
| This coffee cake above is courtesy of Lillabee, a wonderful, gluten/dairy/soy free baking product company based here in Boulder. Try some of their delicious mixes if you get a chance. |
In the beginning days of my blog, I took all my shots with a 10 year old Canon Rebel SLR camera. I would put it on “no flash” and take photos in the automatic mode. This was okay, but definitely left me feeling limited. After I took Alessandra Cave‘s photography class at the Makerie a year ago, I discovered what aperture was (this is how big the window opens up on your camera.) The lower the aperture number, the shorter the depth of field. After that class, I bought a 50mm/1.4 aperture lens for that same 10-year old camera and have been taking photos with it ever since. Advice: buy a better lens, not a better camera!
 |
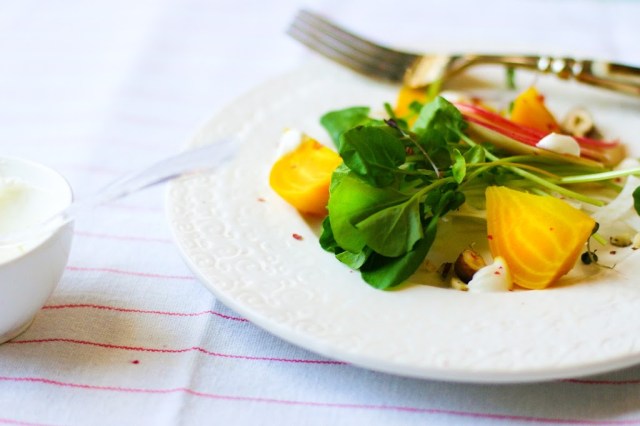
| This gorgeous quinoa-beet salad was made by my beautiful friend Katie, who owns the most adorable personal chef and catering company ever, Eat. |
This is how I would operate and I think it is a good way to start: I would put my camera on the lowest aperture (or pretty close to the lowest) and then, adjust the shutter speed (how long your window stays open) so my light meter was in the right range. Then, I would adjust aperture and shutter just barely based on how the photos were looking. That gives you shots like this below, and the one up above–in focus up front, blurry in back. Cool, but not perfect for all situations.
Taking Aran’s class brought me a step further. She made me realize that though a shallow depth of field can be stunning, it just isn’t everything. There are times when you want that crisp, in focus look for most of the shot–especially when shooting from up above. The problem I ran in to with my prior method of taking photos was that I couldn’t get my aperture high enough to make it all come into focus and still have enough light to take the photos inside. To get enough light, my shutter would need to stay open too long and the photo would come out blurry.
This is what I learned–the trick to closing aperture further to get more of the shot in focus, while taking inside photos, is adjusting the ISO. The ISO is how sensitive your camera is to light. If you use a high number, you can take photos in darker locations, though your image will be grainer. Here is an example of a photo at a higher ISO, and a larger aperture number.
 A year ago, thinking of the ISO in addition to the other numbers made me freeze up. It overwhelmed me to consider so many variables at once. But, having worked with the shutter speed and aperture so much over the last year, it felt perfectly natural to layer in the ISO changes with the other pieces. Like all things, it will certainly take practice, but I love watching my skill level expand and blossom as I practice something. (I was trying to explain this to my daughter this morning as she worked on her first friendship bracelet and her knots were all over the place.)
Here are some of the tips I picked up during Aran’s class:
1. YES! you should use reflectors. I had figured out the use of diffusers on my own, but still hadn’t made reflectors a regular part of my photography. I certainly will now. Using a reflector, whether a professional screen or a bit of white cardboard, can make all the difference in getting that light just in the right spot to highlight your food or product.
2. Use interesting backgrounds, fabric, an old door, a windowsill, or a great table top to set your food upon. Aran shoots most of her work on a folding table in her son’s bedroom and has different surfaces she can pick or choose from. This brings up something else–find your best light, even if its two flights away from your kitchen.
If you are shooting from the side, think about using different boards for backdrops, like a piece of plywood with a layer of distressed paint. Below is an example of a shot I like, except it needs a background to take away the distraction of that darkness in the back. A cool neutral or blue painted board would have helped.
3. Don’t be scared to shoot from a bird’s eye view. If you do, increase your aperture and your ISO so you can get a sharp image of the product, while still getting good light. If you are shooting from up above, make sure you are directly above your food, not at a slight angle.
4. If the interesting part of your food is the texture and the quantity, shoot from the side. If the fascinating part is the whole plate, shoot from up above.
5. The success of a photo is in the details. Straighten the lines of your fabric, add micro greens, sprinkle on colored pepper, make some crumbs, add cool utensils, forks, straws, etc. Also, if you’re going to add details, add ones that make sense to the food. i.e. add milk to cookies, a dish of dressing to a salad photo, etc.
What an amazing experience. Definitely go check out Aran’s blog. Or, go look at this spread in Design*Sponge. The lemon with that purple is absolutely to die for!
Try it! photographing food is fun! and you get to eat it afterwards! Can’t say that about a pearl necklace.
xo anne


Leave a comment
This site is protected by hCaptcha and the hCaptcha Privacy Policy and Terms of Service apply.