A Doll DIY Party
In this lovely, hand made, web world of party DIYs, why not pull together a Doll DIY Party!? The other day, Allie brought me out of my knitting book insanity with a craft book in hand asking, “Can we make this doll?” My first reaction was “Is she nuts?? I absolutely have no time to make anything but gorgeous knitting projects right now!” Then, I took a deep breath and remembered, ah yes, this whole blog started so I would take more time to make with my family! This request from Allie provided two reasons for absolute joy: One, she had carefully chosen a crafting book from the school library, yahoo!! Two, she wanted to make something out of it WITH ME completely unprompted, success!
She and I spent the morning stitching the adorable doll above from Jane Bull’s Made by Me. It had patterns for the skirt and shirt, a nightie and a little bag to carry the whole thing. One side of the doll face is awake, one is asleep. Allie calls her Megan. She is absolutely adorable, for sure. More importantly, Allie and I had a ball making her together.
Then, came play time. We decided that the doll, Megan, simply had to host a Doll DIY party and invite all the little mini-friends piled in the far reaches of her room. Allie and I got to work. Allie loved helping me do this, from painting the paperboard, to cutting the fabric, to the punching part, we loved each step!
This Doll DIY party used the goodies from my 12 Months of Martha Box. For more great 12 Months of Martha projects from other fabulous bloggers, check the hashtag #12MonthsofMartha. Directions for making each piece is below.
Allie and I started with hand painted plates. We added adorable floral napkins in gold rings.
We made colorful party lanterns and a fabulous circle bunting. I will say for the record that this made me want to do the whole thing over in adult size!
The bouquet might have been the most fun part of the whole event.
I collected the sweet little blossoms for this bouquet on my run the morning we planned to “throw” the party. I was thinking about how I would need to go to a florist shop to try and beg off little bits of greenery and flowers when I happened upon Queen Anne’s Lace along a nearby stream. I quickly grabbed a handful and kept my eyes open. Between wild roses, buttercups, and little mini-daisies, I had a whole fist full before my 3 miles were up. I must have looked quite the scene with a window box of flowers blooming from my jog bra, but we must multi-task when we can, right?
Any one who is anyone in Allie’s room was invited to join us. Miss Pink was particularly pleased.
Megan was thrilled with the success of her party, so was I. It’s easy and fun to pull together, so give it a whirl!
Doll DIY Party
Supplies not shown above:
White paperboard, cardboard or card stock
Scrap fabric
Mini flowers
Bottle cap
DIY Doll Party Plates and Napkins


Paint cardboard or paperboard in bright summer colors. Punch scalloped circles with scallop layering punch capturing two paint colors. Use the bottle cap to form the center of the plate folding the scalloped edges up around the cap.

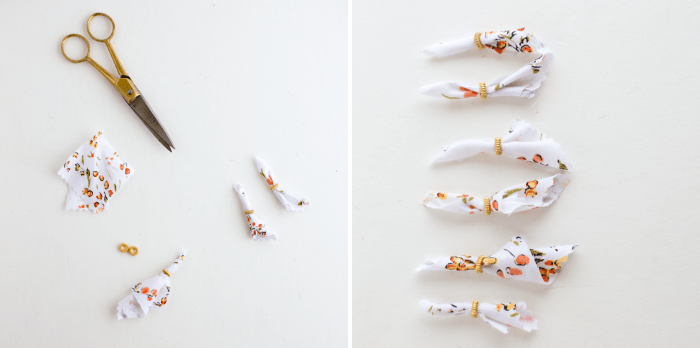
Using old scrap fabric, cut 1 1/2 inch squares. You can use pinking shears if you don’t want the fabric to fray. Pull the squares through jewelry jump rings for napkin rings.
DIY Doll Party Garland


With Martha Stewart Hole Punch, make a bunch of multi-colored circles. Use a dab of glue and sandwich the embroidery thread between two circles at even intervals along desired length.
DIY Doll Party Bouquet

These little gems are gathered with a mini-hair elastic and placed into an egg cup. CUTE!
DIY Doll Party Lanterns


Using the Martha Stewart Scallop Layering Punch, punch the scallop outline out of the painted cardboard. Fold each circle in half and apply a thin layer of glue. Matching the scallops, secure another folded scallop circle in a new color. Each lantern uses six scallop circles. I found it easiest to do three at a time, making two halves. Then glue the two halves together securing a thin piece of embroidery thread as you put the halves together. Hang!
Hope your summers are progressing fabulously and you’re finding time to make with your little ones!


Leave a comment
This site is protected by hCaptcha and the hCaptcha Privacy Policy and Terms of Service apply.